

Key points of ZDNET
- Raspberry Pi M.2 HAT+ for Pi 5 is now available to pre-order from CanaKit, PiShop.USAnd Sparkfun for about $12.
- An easy way to add M.2 peripherals to Raspberry Pi 5.
- May cause overheating under certain circumstances.
The Raspberry Pi 5 There is no doubt that it is The best Raspberry Pi hitherto. Unlike its predecessor, it is quite easy to acquire and is a solid, powerful platform on which to build projects. Additionally, the Raspberry Pi 5’s single-lane PCI Express 2.0 interface makes connecting M.2 peripherals such as NVMe drives and AI accelerators easy.
Also: Best M.2 SSD
The Raspberry Pi HAT (Hardware Mounted on Top) I want to test is the M.2 HAT+. Having now had the chance to use it, I have to say I’m impressed. This add-on could allow the Pi 5 to be used in interesting projects.
Raspberry Pi M.2 HAT+
- PCIe interface: PCIe 2.0 (user can set to 3.0)
- M.2 compatibility: M keys 2230 and 2242
- Power: Up to 3 amps
- Efficiency: Up to 450MB/s
- GPIO: Passthrough via included 16mm stacked header
- Size: 65mm x 56.5mm
- Hardware provided: 16mm stacking headers, spacers and threaded screws, and dual knurled flange screws to secure and support M.2 peripherals
The M.2 HAT+ attaches to the 16-pin, 0.5mm pitch FPC connector on the Pi 5’s board using a short ribbon cable:
This cable connects the HAT to the Pi 5.
Adrian Kingsley-Hughes/ZDNET
This connector is usually easily accessible, but since all my Pi 5s are in cases, I had to remove the board to install the PCIe cable:
Remove the Pi 5 from the case to install the PCIe cable.
Adrian Kingsley-Hughes/ZDNET
Someone with smaller hands or more patience could fit the cables to the board in the box, but I have big hands and little patience.
Also: Find a Raspberry Pi: Where to buy the latest model and alternatives
If you need to use — or think you might need — GPIO pins, remember to install a stacking header to get the headers into the HAT:
Remember the stacked header.
Adrian Kingsley-Hughes/ZDNET
With the cables installed, it’s time to secure the board to the risers and then we’re ready to install the M.2 peripherals:
With the HAT installed, it’s time to install the M.2 peripherals.
Also: These are my 3 must-have Raspberry Pi accessories
A variety of M.2 peripherals are available, from storage drives to AI accelerators. Here, I will use an M.2 SSD. This area is where the official Raspberry Pi M.2 HAT+ differs from other M.2 HATs I’ve used — yes, there is others outside there — because the peripheral worked immediately and I encountered no compatibility issues with any of the storage drives I tested.
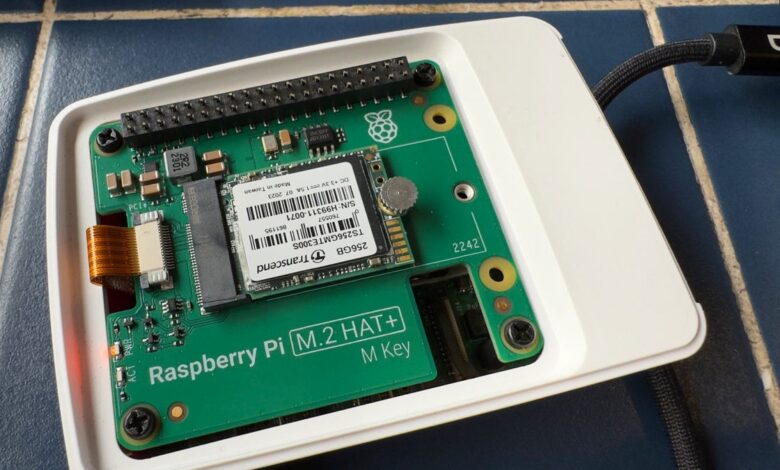
For performance tests, I used one 256GB Transcend M.2 PCIe Gen3x4 2230 NVMe Drive combines good quality performance and reliability, while being competitively priced.
Transcend M.2 PCIe NVMe drives are included in the M.2 HAT+.
Adrian Kingsley-Hughes/ZDNET
The drive is fixed with a knurled screw:
The drive is secured to the M.2 HAT+.
Adrian Kingsley-Hughes/ZDNET
Setting up the drive is quite simple if you’ve done some work with the Raspberry Pi and the process is completely straightforward. is fully documented on the Raspberry Pi website.
I tested the performance of the M.2 HAT+ and got figures hovering around 410 MB/s, which is more than acceptable and I can optimize this number more in time. Present. But for these tests, I kept everything the same.
One thing I noticed while stress testing and benchmarking is that the M.2 HAT+ drive and SSD stayed pretty cool during use. However, because the cooler is sandwiched between two boards, I noticed the temperature spiked to 60°C/140°F and the hottest spot was in the gap on the HAT.
It was quite hot between the two tables.
Adrian Kingsley-Hughes/ZDNET
While not an issue, I can see how this amount of heat could become an issue if the project is placed in different circumstances, in a higher temperature environment, or if the hardware is pushed harder.
But other than that potential issue, this HAT and the Pi 5 both work flawlessly.
ZDNET Buying Tips
Additional M.2 peripherals need to be added to your machine Raspberry Pi 5? Although you can get away with using one of these much the third day–party HAT is out there, I like the performance and reliability of this one Official M.2 HAT+. And for $12, it’s a wise choice.